Wednesday, 18 May 2022

Tortilla de Grelos y Jamon

Tortillas in Spain are almost always eggs and potatoes, with or without onion (and they will fight about it). I frequently see assurances that tortillas can be made with other fillings, but actual examples are very rare on the ground. 

This take is Basque in origin, and makes a very nice change. I find green vegetables a little short in supply in official Spanish cuisine, but given the number of little gardens clustering every small village, people must eat 'em. Any kind of spring green such as turnip greens or raab, or arugula maybe, could be used here. Spinach is probably most readily available here, but something a little more robust would be the best. Good Spanish ham is also ideal but hard to get. Good Canadian ham will work okay, but it too is hard to get these days - so much of it is soaked in brine and gelatine. Don't bother with that. Use a good bacon if you have to (also not soaked in brine... good luck).

2 to 4 servings
30 minutes - 15 minutes prep time
 
Spanish Tortilla with Ham & Greens
 
1 green onion OR shallot
300 grams (10 ounces) turnip greens OR spinach
150 grams dry ham or cooked bacon bits
6 large chicken eggs
salt & freshly ground black pepper to taste
2 tablespoons olive oil
 
Wash, trim, and chop the onion or shallot. Wash, trim, and chop the greens or spinach. Put them in a mixing bowl. Chop the ham and add it, or if using bacon, chop it and fry it until crisp but not browned. Drain the pieces of excess fat and add them. 
 
Break in the eggs, mixing them in one at a time. Season with salt and pepper to taste. 
 
Heat the oil (or you could use the bacon fat if you have it; but use it in a clean pan to avoid sticking) over medium heat in a large skillet. Once the pan is hot, spread the egg mixture evenly in it.  

As it sets, you can lift it up and tilt the pan to allow raw egg to flow underneath. When it is about half cooked - the top will still be not set - carefully flip it out onto a plate by placing the plate over the pan then turning them both over. Slide the tortilla back into the pan, and pour any raw egg remaining on the plate around the edges. Cook until the tortilla is set, but not dry. 

In Spain, this would be served at room temperature, cut into slices - in a sandwich, maybe - or cubes to be eaten as tapas, but you can eat it right away as you would any other omelette if you prefer.


Monday, 16 May 2022

German Cheese & Radish Salad

There are a lot of versions of this simple but substantial German salad; here's mine. You can eat it as-is, but I think it is most often eaten piled on a good sturdy slice of rye bread as it's almost as close to being a sandwich filling as it is to being a salad. I'd be happy to put it in a wrap with a leaf or 2 of lettuce and call it lunch, certainly. But one of my favourite things in the summer if I can round up a few eaters, is to have a salad buffet with a variety of salads, and this would make an excellent candidate for that. Also nice with a bowl of soup on the side.
 
4 servings
15 minutes prep time
 
German Cheese & Radish Salad
 
Make the Dressing:
1/2 teaspoon honey 
1 teaspoon Dijon mustard
1 tablespoon mayonnaise
2 teaspoons dill pickle brine OR apple cider vinegar
salt & freshly ground black pepper to taste

Mix the honey and mustard in a small jam jar or bowl. Mix in the mayonnaise, then the brine or vinegar. Season with salt and pepper, keeping in mind that other ingredients in this salad are salted - it's better to under-salt, and have to pass salt at the table than to overdo it here.
 
Make the Salad:
1 1/3 cups slivered radishes
2/3 cups slivered Gruyere, Emmentaler, Gouda or similar cheese
1 slice dill pickle
2 tablespoons minced chives OR green onion
3 tablespoons minced parsley
 
Wash, trim, and sliver the radishes. Cut the cheese into similar sized and shaped pieces. Dice the dill pickle fairly finely, and wash, dry, and mince the herbs. 
 
Mix everything together and toss with the dressing. Serve with buttered rye bread.


Last year at this time I made Baked Trout with Creamy Leek & Dill Sauce.

Friday, 13 May 2022

Stuffed Tau Pok

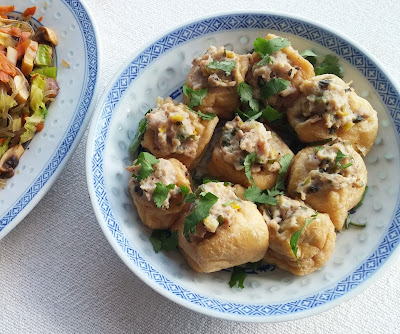
Last time I was in a civilized place - and apparently my definition of "civilized place" is "has a Chinese/Asian grocery store" - I stocked up on tau pok. It freezes extremely well, and I freely admit it is my favourite form of tofu. In spite of consisting of deep fried chunks, it is really not greasy and the resulting chewy/airy texture is terrific. If you think you don't much like tofu and it is the texture that puts you off, this is a good way to try it again and see.

There are a number of traditional recipes for stuffing and steaming tau pok. My take on it combines things from 2 popular versions, mostly as a matter of expedience; other than the tau pok itself these are all ingredients I can get around here. 

I found the oyster sauce added a necessary punch of saltiness to these - in spite of the fish sauce, they were not really salty in themselves. If you don't have any oyster sauce, add a bit more fish sauce or double the salt in the filling.
 
16 to 20 pieces
1 hour - 20 minutes prep time
assumes puffs are steamed in 2 batches


Fried Tofu Puffs Stuffed with Meat and Green Onions

250 grams (1/2 pound) ground pork OR chicken
2 tablespoons fish sauce
1/4 teaspoon salt
freshly ground black pepper
1 tablespoon arrowroot OR corn starch
1 tablespoon finely grated fresh ginger
2/3 to 1 cup finely chopped green onion OR chives
2 teaspoons mild vegetable oil to oil dish
1 package (185 grams; 6.5 ounces) fried tofu puffs (tau pok)
about 1/2 cup chicken stock
oyster sauce
cilantro 

Put the ground meat in a bowl with the fish sauce, salt, pepper, and arrowroot. Peel and grate the ginger, and add it. Wash, dry, trim, and chop the green onions or chives very finely and add them. Mix everything very well. 

Set up your steamer; it should hold the stuffed tofu in a dish. Mine would only hold half at a time so I set up 2 dishes to go into it. Lightly oil the dish or dishes, and turn the heat on under the steamer. If you are doing it in two rounds, be sure there is plenty of water in it, or that you can add boiling water to top it up if needed. 

Meanwhile, stuff some tofu. Cut a slit in one side (top) of each puff and put in a bit of the filling You can stuff in more than you might think and I found it useful to score off the bowl of filling to make sure it was being more-or-less evenly divided. There were 18 puffs in my package, but they are plainly hand-cut and varied a bit in size so quantity may not be exact either. Arrange them in the oiled dish(es) in a single layer, stuffing up. Place them in the steamer and pour a little chicken stock on them; just enough for them to be sitting in about 1/4" of it. Steam for 20 minutes. If you have a rack or similar thing that can go under the plate to be steamed, and which has handles to allow it to lift the plate out, that is very helpful.

If you have a second dish, check the water level, and steam it for 20 minutes with a little chicken stock in the same way. 

These will be very hot when they come out, and the spongy tofu holds some of the broth to burst out and burn you when bitten, so let them sit for a full 10 minutes before serving. Garnish them with a drizzle of oyster sauce and a sprinkle of chopped cilantro, if you like. 


Last year at this time I made Sorrel Soup.

Wednesday, 11 May 2022

Migas with Beans & Greens

I've found myself poking around at Portuguese recipes quite a bit the last few months. It started with a (continuing) interest in Spanish recipes, and not surprisingly there is some degree of overlap. Portuguese cuisine is a bit different though, and it has some really delicious dishes. 
 
For one thing, my impression is that Portuguese bread and pastry baking is the better of the two. This dish would usually be made with corn bread - mostly wheat, in spite of the name, but with enough corn flour in it to turn it golden and give it a marvellous flavour. Alas, while you can find it at Portuguese bakeries in larger cities there is none around here. Where you find good bread, you also find recipes to use up the stale leftover bits. 
 
This is usually made with black-eyed peas, but navy beans make a good substitute. Despite the simple technique and very short list of ingredients, we thought this was really delicious. For our bread crumbs, I used two ciabatta type rolls and they were fine, although I do regret that corn bread. 

The Spanish also make a lot of "Migas" (crumbs is what it means) dishes, but I have yet to see one with beans, and while cilantro seems to be quite common in Portuguese cuisine (which for some reason surprised me) it is rarely used by the Spanish. Likewise, Piri-Piri hot sauce is a popular Portuguese condiment but the Spanish rarely apply any kind of chile to their food beyond a little very mildly hot paprika.
 
2 to 4 servings
30 minutes prep time
NOT including cooking the beans and greens
 
Migas de Broa com Grelos e Feijão - Bread Hash with Beans and Greens
 
1 cup dried navy beans OR black-eyed peas
4 cups chopped turnip or rutabaga greens, OR kale OR spinach OR rapini (raab)
200 grams (5 ounces) diced stale bread
2 or 3 cloves of garlic
1 small onion
3 tablespoons olive oil 
a little minced fresh cilantro or parsley (optional)
 
The beans should be cooked in advance in the usual way; cover in water and bring to the boil. Turn off the heat, cover, and soak for at least one hour. Drain, replace the water, add 1/2 teaspoon salt, and simmer until tender OR cook them in an Instant Pot for 5 to 7 minutes, with natural pressure release. 
 
The greens should also be cooked in advance; wash them very carefully and pick them over, then wash them again. Plunge them into boiling water or steam until just wilted, then rinse in cold water. Drain them again; in fact, squeeze them to remove excess liquid. Chop finely. 
 
It is possible and even reasonable to speed this dish up considerably by using tinned beans (one tin of the beans of your choice) and frozen greens - you will want about 300 grams or 10 ounces. This also makes it a good dish to make in the winter.
 
NOW, let's get started: peel and mince the garlic. Peel and chop the onion finely. Slice the bread, and crumble it into pieces about twice the size of a bean. 

Heat the oil in a large skillet over medium heat. Add the onion, and let it soften and get fairly translucent, then add the bread crumbs and toss well. Cook gently for several minutes, turning regularly, until they are dry and toasted in spots all over. Add the garlic and mix it in well; give it a minute to cook. 

Add the drained beans and chopped greens. Mix in well, and let everything heat through. You may wish to add a little of the cooking water from the beans or the greens. The finished texture of the dish may range from fairly dry and crisp through moist, through almost soupy - it is a matter of taste. I prefer a drier texture, and my bread was not that stale to start with, so I did not add any but you must use your own judgement - it is that kind of dish and all the proportions are also somewhat up for grabs. 

Serve it as a meal by itself for 2 people, or serve it as a side dish with grilled meat, poultry or fish for up to 4 people. A poached or fried egg on top would also go very well.


Last year at this time I made Chicken Pozharski.

Monday, 9 May 2022

Ukrainian Egg & Green Onion Pie

Egg pies are very common in Ukrainian cuisine, often in the context of Easter and mostly made with a yeast-raised dough. This one is more like the Russian "lazy" pies I have been making for the last few years, with a baking powder batter encasing, in this case, hard boiled eggs and green onions along with some other herb if you can get it. The result is an excellent breakfast, brunch, or lunch dish that goes together very easily and doesn't take all that long to bake either. 
 
I used spelt flour, as I so usually do; it worked very well. 
 
4 to 6 servings
1 hour - 30 minutes prep time
 
Ukrainian Egg & Green Onion Pie

Prepare the Filling:
4 large eggs
1 bunch green onions
1/4 cup finely chopped parsley OR dill
salt & freshly ground black pepper
 
Put the eggs in a pot of water to cover, and bring them to a boil. Boil for 1 minute, then remove from the heat and cover. Let them sit for 10 minutes, then place them in cold water to cool. 
 
Wash, trim, and chop the herbs. Peel the eggs, chop them coarsely, and add them. Season with salt and pepper.

Make the Pie & Bake:
1 1/4 cups whole spelt flour
1/2 teaspoon salt
1/2 teaspoon baking soda
1/3 cup mayonnaise
1/3 cup thick yogurt
3 large eggs
1 teaspoon unsalted butter 

Mix the flour, salt, and baking soda, ideally right in the measuring cup. Mix the mayonnaise and yogurt in a mixing bowl, and break in the eggs and mix one at a time. 
 
Preheat the oven to 350°F. Lightly oil a 9" pie plate with the butter. 
 
Mix the flour into the wet ingredients until well blended. Spread about half the batter in the prepared pie plate, then sprinkle the eggs and herbs evenly over them. Dollop the remaining batter over the eggs and herbs until they are covered. 
 
Bake at 350°F for 30 to 35 minutes, until cooked through. Let rest until just warm or room temperature before serving. Keep any leftovers well wrapped in the fridge, but bring them back up to room temperature to serve. However, this is best freshly made.


Last year at this time I made Leek & Sorrel Quiche.

Friday, 6 May 2022

Pasta with Rutabaga Greens, Anchovies, Garlic & Chile

Here is a lively take on one of my favourite ways to prepare pasta: the pasta and some vegetable are cooked together then dressed with something richer and perhaps fried. In this case not fried, so much as infused into a generous but not too greasy amount of olive oil. (If your anchovies come with a certain amount of oil, by all means start with that when you measure the oil.) All the flavours are very strong, but in spite of that they get along with each other excellently. I used whole wheat pasta - I mostly do these day, on the rarish occasion I eat pasta at all - which can be a bit robust for more delicate sauces but which mingles well with all these equally robust ingredients. Use whatever pasta you like, though. 
 
Rutabaga greens are, as I've said before, the best (non)turnip greens, but turnip greens could be used, or Swiss chard, kale, or collards in their season. Rapini or broccoletto too, would be good, meaning this is a dish that can be made any time there are good, astringent greens around. Spinach? I think it's a little too refined to be ideal for this hearty dish, but it would work well enough if that's what you can get. Apply it with a little heavier hand, maybe. 

I'm saying 20 minutes, which is about the time for the water to come to a boil and then cook the pasta and greens, but if your greens are at all obstreperous about needing picking over, allow a little longer.
 
2 to 4 servings
20 minutes prep time

Pasta with Rutabaga Greens, Anchovies, Garlic & Chile

300 grams (10 ounces) rutabaga greens
6 to 10 cloves of garlic
1/4 to 1/2 teaspoon chile flakes
freshly ground black pepper to taste
25 grams (1 ounce; 1/2 small tin) anchovies
225 grams (1/2 pound) pasta
1/4 cup olive oil
 
Put a large pot of salted water on to boil for the pasta.

Wash and trim the greens, and chop them. Peel and mince the garlic, and put them in a small bowl with the chile flakes and pepper. Drain and mince the anchovies. 

When the water boils, add the pasta and set the timer for 1 minute longer than the recommended cooking time. When the pasta has 6 minutes left to cook, add the green, mixing them in well. 

Meanwhile, heat the olive oil over medium-low heat in a smallish skillet. When it is hot, mix in the garlic with the spices, and the anchovies. Allow them to sizzle gently in the oil until very fragrant, then remove from the heat and set aside. 

When the pasta and greens are cooked, drain them well and return them to the pot. Toss them with the hot seasoned oil and toss well to combine. Serve at once.


Last year at this time I made Cipollata.

Wednesday, 4 May 2022

Saag Paneer

I've made Saag Paneer a few times over the years with the idea that I would post it on this blog. All my attempts have been okay, but did not leave me feeling like it was the best Saag Paneer ever. I'm not sure this is either, although we found it very satisfactory. I suspect the best Saag Paneer ever contains more in the way of butter and cream. 
 
This is a dish that also tends to contain tomato; while it's not really in season at the moment, canned crushed tomatoes would be perfectly fine. However, so many of the Indian (inspired) dishes I make have tomatoes in them that I wish to have a few in my repertoire that don't have any, just to supply a little contrast. 
 
Garden spinach should be at its peak right now, but alas - the up-and-down weather we've had all spring (and through the winter too, really) was very hard on it and the mice have found it too. This may be it for our spinach this year. 
 
4 to 6 servings
1 hour prep time

Indian Style Spinach with Cheese

Get Started:
600 grams (20 ounces) blanched spinach OR other mild, tender greens
250 grams (1/2 pound) paneer OR halloumi cheese
1 teaspoon mild vegetable oil
1 large onion
1 tablespoon mild vegetable oil
 
Wash the spinach or other greens very well, and chop them coarsely. Put them in a colander and pour boiling water evenly over them to wilt them thoroughly. Rinse them in cold water, drain them well and squeeze them dry. Chop them finely and set them aside. 
 
Rinse and drain the paneer, and cut it into small cubes or lozenges (small bite-sized). Heat a skillet over medium heat with the oil - just enough to put a film over it - and cook the cheese on both sides until golden brown. Transfer to a dish and set aside.
 
Peel and chop the onion. Heat the oil in the skillet, and cook the onion gently over medium heat until softened and translucent. Add it to the prepared greens. 
 
Prepare the Spices:
1/4 to 1/2 teaspoon salt
1 teaspoon cumin seed
2 teaspoons coriander seed
1/8 to 1/2 teaspoon hot chile powder
1 teaspoon ground turmeric
1 tablespoon finely grated fresh ginger
3 or 4 cloves of garlic 

Grind the cumin and coriander with the salt, then mix them with the remaining spices in a small bowl. Peel and grate the ginger and garlic and add them. Set aside.
 
Finish the Dish:
2 teaspoons mild vegetable oil
2/3 to 3/4 cup thick yogurt  
1/2 lemon, cut in wedges (optional)

Heat the oil in a large heavy-bottomed pot over medium-high heat. Add the bowl of spices, and cook, stirring constantly, until fragrant. Add the blanched spinach and onion and mix in well.  Begin working in the yogurt, a scoop at a time until the mixture has reached a level of creaminess that seems right to you. Once it is hot through, add the cheese and continue to simmer until it too is hot through. Serve at once, although this re-heats quite well so it could be made in advance.


Last year at this time I made Barley with Sorrel.

Tuesday, 3 May 2022

First Garden Update of the Year


This post was conceived of as going up last Friday... but Friday came and went, and I had not even taken any photos. And that's how this garden season is going. 
 
In addition to already having iffy, up-and-down weather (mostly down, though; let's be real) I have the energy and focus of a brain-damaged sloth. We planted our usual eggplant, pepper, and tomato seeds, and the eggplants and peppers failed to germinate. I think I turned the heat down in the room where we keep them to germinate, and it just was not warm enough. The up side is, most of the pepper re-plants have now germinated; they are a little behind but given the weather forecast I guess that's okay. I think the eggplant seeds got over-fermented last fall, and are no good. Oh well.

As for everything else, in between bouts of Mr. Ferdzy obsessing about the possibility of imminent nuclear war and his mother's worsening dementia, I find I prefer to zone out with Elder Scrolls Online instead of doing anything actually useful to make my life function. It's not like we are going out anywhere; the lifting of lock-down and the fact that it takes hours to try to get any kind of a picture about the local Covid situation paradoxically means we have gone back to ordering our groceries on-line and not going anywhere unless absolutely required. We are encouraged in this behaviour as we have, for the first time, a (quadruple vaxxed) family member with a bad case. Pretty sure she'd have been dead without them as she is not young and has a lot of health problems already. 


So! Let's try to be a little more cheerful. There is our usual "greenhouse" set up on the driveway, although it is a bit hard to get days that are both warm and bright enough to make it useful.


Mr. Ferdzy has ordered his spring order of gravel, and is continuing to improve the paths he has been constructing for the last couple of years. I've been drafted to help by raking it out as he hauls it; the bad news is that I am not doing anything else much of a long list of things to do, but the good news is that it is going quite quickly and I expect to then be able to get his help for the other stuff.


Some few of the wild leeks we transplanted a few years back are persisting very well, although not nearly enough to pick any of them. Still, it's encouraging to see them.


These are some overwintered "raab" greens we got from The Experimental Farm Network last year. We have not tried them yet; but they are starting to be ready and we will be picking some in the next few days. They look like a great combination of the qualities of turnip greens and broccoletto, and they overwintered very well and are on a par with fall-planted spinach in terms of being early. We're excited to try them. 

Those little pop-bottle greenhouses are less to keep them warm and sheltered, although I'm sure they did, and more to keep our greens from being eaten to death by little rodents. That problem is definitely ongoing.


On the left, some Brussels sprouts are surviving so far, and I have hopes of growing them out for seed. These are Early Half-Tall - a hard type to find, but the one that has done the best for us, other than seed saved from Long Island Improved. Seed adapted to your own garden is always the best, so we are hoping to get seed from these and see even better results. We will plant watermelons in this bed and the sprouts should be able to go to seed up through them with everyone being happy.

In the next bed, some overwintered Swiss chard and very battered kale. Which, as usual, we didn't eat. Every so often I get the bug to grow some kale because it does so well and is an interesting plant, but the reality is that we... just... don't... eat.. it. You'd think I'd grasp that point by now. 

The tall stalks are from the popping sorghum; a bit of a failure. I picked them but they just did not completely mature in last year's cool fall. 

In the back, we are experimenting with seeing if we can get a bit of early asparagus by covering it. Not so far.


More early signs of greens - the sorrel (2 plants on the upper right) are further along than they look; I've picked some already. The fluffy, celery-looking thing in the bottom right is a lovage plant. I planted it last year and didn't pick much as it was just getting established, but I'm pleased to see it's an early bird. Not that lovage is going to get used as a green: it's a very strong flavoured herb best used with discretion. Still! Nice to have a fresh herb this early. My chervil mostly failed to germinate; I think there are 2 or 3 little plants. Not enough to do much with and I may leave them to go to seed because maybe mine is getting old.


More sorrel in the back; dead cauliflowers in the pop-bottles - I keep hoping to overwinter them and get them to produce seeds, and it keeps not happening - and another perennial spring green, échalotes de Ste Anne. I bought a dozen a few years ago, gave away 80% of them, and still have lots. They divide like crazy and spring green onions are a delightful treat. I was dubious at first but they are turning out to be well worth growing. 
 
In the back; mousetraps, not actually trapping any mice or other rodents. We still need a better plan. 


Another early spring green, new to us and not tried yet. This is hablitzia tamnoides, also known as Caucasian spinach. I've been trying to grow it for 3 years now, but it kept being eaten to death by the rodents. Again, pop bottle armour to the rescue. This batch is now in its second spring and far enough along we'll be able to actually pick some soon. And thus I am able to end on a more cheerful note, although who knows if we will even like it. Although given the enthusiasm of the rodents for it, I am in fact hopeful.

Monday, 2 May 2022

Turkish Shepherd's Pie Kebab

Classic meat and potatoes, the Turkish way! I see a lot of versions of this on Pinterest, with the meat portion and potato portion shaped in different ways, but the dish overall consisting of all the same parts. The dishes get different names, but really, it's these components in some configuration. 

The easiest way, and the most like a classic shepherd's pie, would be to press the meatloaf mixture into a shallow baking pan, and then when the time comes, pour on the sauce then spread the potatoes evenly over the top. I've seen that done. But this shaping the meat into individual cups to hold the potato topping is even more common, although the exact shape varies quite a bit. For some reason Turkish dishes often are made into a group of clearly delineated portions like this. Perhaps it's so that if you have a large family, you know the dish will make it all they way around the table without running out because the first people to be served take too much? Or maybe I'm over-thinking it. 

At any rate, these were cute, not hard to make, and a very satisfying take on the theme of meat and potatoes. I used lamb, which is always the proper meat to use in a shepherd's pie; otherwise it's technically a cottage pie although few people seem to stick to that convention these days.
 
4 to 8 servings
2 hours. This is going to take 2 hours, with 1 1/2 hours being prep time.
 
 
Mix the Spices:
1/2 teaspoon salt
1/2 teaspoon allspice berries
freshly ground black pepper to taste 
1 teaspoon sweet or smoked paprika
2 teaspoons rubbed dry mint

Grind the salt and allspice berries, then mix all the remaining spices with them in a small bowl.

Make the Meat Patties:
1 medium onion
1 small carrot
1 cup shredded cabbage
1/4 medium red pepper
2 cloves of garlic
1 tablespoon mild vegetable oil
500 grams (1 pound) ground beef OR lamb
1 large egg
 
Preheat the oven to 375°F. Lightly oil a baking pan. 
 
Peel and finely dice the onion. Peel and grate the carrot. Wash, trim, and shred the cabbage. Deseed the pepper and dice it finely. Peel and mince the garlic.

Heat the oil in a small skillet and cook the onion and carrot until softened. Mix in the little bowl of spices. Add the garlic then the cabbage, and cook, stirring until just wilted down. Transfer it all to a mixing bowl and let it cool. 

Mix in the ground meat and the egg by hand, until you have a smooth evenly blended mixture. 

Divide the mixture into 8 equal portions, and form each one into a ball. Then press in the middle and shape each ball into a shallow bowl. Place them in an oiled baking pan, that fits them snugly but in a single layer. Bake for 20 to 30 minutes (the time necessary to cook the potatoes).

Make the Potato Topping:
700 grams (1 1/2 pounds) potatoes
3 tablespoons unsalted butter
1/3 cup yogurt
1/2 teaspoon salt
freshly ground black pepper to taste

Wash, trim, and peel (if you like) the potatoes. Cut them into even chunks. Put them in a pot with water to cover them well, and bring to boil. Boil steadily until fork tender; 10 to 15 minutes. Drain them well and mash them with the butter, yogurt, salt, and pepper. 

Finish the Dish:
1/4 cup tomato sauce
1/4 cup water
125 grams (1/4 pound) Cheddar cheese 

When the potatoes are cooked and mashed, and cool enough to handle (but still fairly hot) divide them into 8 equal portions. Shape each portion into a ball, flatten slightly, and place one on each hot, partially-cooked piece of meat. 
 
Mix the tomato sauce and water, and pour it around the meat patties.

Grate the cheese and sprinkle it over the dish. Bake at 375°F for another 20 to 30 minutes, until the cheese is browned and bubbling. Let rest 10 minutes before serving.


Last year at this time I made Vietnamese Style Noodle Salad.

Wednesday, 27 April 2022

Maple-Tahini Haystacks

I was surprised to do the math on these and see that they are really not too bad for carbs. They were hauntingly delicious, and honestly? At half a cup of maple syrup I thought they were a touch too sweet. I might try them again with 1/3 of a cup of maple syrup. Of course, I have gotten used to barely-sweet treats. The other thing I would change next time is the size of oat flake I use. This time I used large flake oats, and found them a little too prominent. I think quick-cook oats would be better. But large flakes did not keep them from being scarfed down with enthusiasm. Hauntingly delicious, did I say? 

Like other dropped unbaked (stove-top) cookies these are stupidly fast and easy to make. I found they stayed a little sticky (another reason to reduce the maple syrup slightly?) so they were best kept in the fridge, with plenty of parchment paper to keep them separate, but they were eaten quickly enough it wasn't a big deal. 

I am trying not to make sweets too often, so it may take me a while, but if I change the amount of maple syrup I will update this recipe.
 
Makes 24
20 minutes prep time

Maple-Tahini Drop Cookies

1 1/4 cups rolled oats
1/4 cup oat bran
1/3 cup unsalted butter
1/2 cup maple syrup
1/4 teaspoon salt
3 tablespoons tahini
 
Measure out the oats and oat bran and set them aside mixed together. Set out a sheet of parchment.
 
Put the butter, maple syrup, and salt into a heavy-bottomed 1 litre/quart pot and bring to a boil. Boil gently but steadily for 5 minutes. Stir in the tahini and remove the pan from the heat. Stir in the oatmeal and bran. Cover and let rest for 5 minutes.

Scoop the mixture out onto the sheet of parchment with a small disher or tablespoon. Leave them until cool and set. Keep covered in a cool, dry spot.


Last year at this time I made Nem Nuong - Vietnamese Pork Loaf.

Monday, 25 April 2022

Potato Chips Spanish Tortilla

I've seen this recipe around for years; it was definitely a little fad for a while. Finally, I got around to trying it myself. The theory is that is in a real Spanish tortilla, potatoes are slowly fried to beautiful golden-brown before having the egg mixture poured onto them and being cooked into a tortilla. It's a long, slow process! Here, potato chips are "reconstituted" in the egg mixture, and then become golden-brown, soft potatoes that are then cooked into a tortilla. 

My verdict - it's not bad, it's an okay tortilla, but not worth the buzz. It's something I'd do on a camping trip maybe, because it would save on the hauling around of actual potatoes and it's something you could do over a campfire, providing you had hauled in a good heavy skillet. Huh. This is already looking kind of problematic as an idea, actually. 
 
Needless to say, if you decide to try it, you should use the best quality potato chips you can find. They should be unsalted or only very lightly salted, and adjust any salt you add to the eggs accordingly. 

If the Spanish have a second civil war, it will be over whether one puts onion into a tortilla, or not. I am a firm concebollista, yesterday, today, and forever! But if you don't want it, it is conceivably possible to leave it out. Or use onion-flavoured chips, maybe.
 
2 to 4 servings
30 minutes - 20 minutes prep time
 
Potato Chips Spanish Tortilla

1 shallot OR small onion
6 large eggs
170 grams (6 ounces) thick potato chips
a pinch of salt (maybe)
freshly ground black pepper, other herbs to taste
2 tablespoons olive oil

Peel and mince the shallot or onion. 

Break the eggs into a mixing bowl, whisking between each one. Add about 3/4 of the potato chips, pressing them gently into the eggs, and let them soak for about 15 minutes. Turn and baste them with the egg occasionally, and also season them with the salt and pepper, and any other seasonings you may wish to add. 

Heat 1 tablespoon of the oil in an 8" skillet and cook the onion gently over medium heat, stirring as needed, until softened and reduced in volume. Let it cool a minute then add it to the egg mixture. 

Wipe out the pan with a bit of paper towel, leaving as much of the oil as possible but getting up any little bits of onion which may scorch or cause the tortilla to stick. Add a bit more oil as needed to cook the tortilla. Heat the pan over medium heat - a little cooler than for most omelettes. 

Pour in the eggs and potato chips, spreading them out as evenly as possible and pressing the chips - by now they should be quite soft - down into the eggs. Cook gently over medium heat, shaking the pan occasionally to prevent sticking, until the bottom half is well set. 

Flip the tortilla onto a plate - be careful and do it over the counter because the top will still be somewhat liquid - then slide it back into the pan. Lift one corner to pour in any liquid egg etc that didn't make it back into the pan. Continue to cook and shake, until the bottom of the tortilla is set. Slide it out onto a plate - a clean one, whether you have washed and dried the first one or are using another - and let it cool to just warm or room temperature before serving. Serve it garnished with the remaining potato chips. 


Last year at this time I made Creamed Carrots & Belgian Endive.

Friday, 22 April 2022

Wild Rice & Halloumi Patties

I was a bit startled to write up this post then go to last year's date and see that I had made something extremely similar then. The thing is though, I make a lot of fried patty things; usually some variation on Vegetable Patties. They provide carbohydrate, protein, and vegetable all in one dish. Sometimes I make a little salad to go with them, but usually it's just the patties, and they are lunch; quick and satisfying. 
 
Some sort of sauce is nice to finish them off. I don't make the Apple Butter Chutney much anymore, alas, as it has too much sugar, so it's usually garlic-yogurt or a mix of half and half chile-garlic sauce and mayonnaise. The yogurt is probably the best choice for these, as it was with last year's iteration. Leftovers? Not too carby for most people to put them into a bun with some sauce and a slice of tomato and lettuce leaf. If you want to reheat them, a minute or so on each side in a hot skillet is better than the microwave.

The only salt that should go in is with the wild rice; halloumi is salty and will provide ample more. I keep meaning to rinse halloumi before I use it, just to see if it could be a little less salty.
 
4 servings
1 hour to cook the wild rice plus time for it to cool
20 minutes to make and cook the patties
 
Wild Rice & Halloumi Patties

Cook the Wild Rice:
3/4 cup wild rice
1/2 teaspoon salt
2 1/4 cups water

Place the wild rice, salt, and water in a rice cooker, and cook. This can be done up to a day in advance. 

Make the Patties:
1 medium carrot
1 small onion
1 clove of garlic
1 tablespoon mild vegetable oil
1/3 cup minced parsley OR cilantro
250 grams halloumi cheese
1/4 cup potato starch
freshly ground black pepper to taste
1 teaspoon rubbed savory OR thyme
2 large eggs
mild vegetable oil to fry
 
Peel and grate the carrot. Peel and finely chop the onion. Peel and mince the garlic. Heat the oil in a small skillet and cook the carrot and onion gently over medium heat until softened, stirring regularly. Add the garlic and cook for another minute or so. Transfer to a mixing bowl and let cool slightly. 
 
Wash, dry, and mince the parsley or cilantro. Grate the cheese. Add both to the mixing bowl of vegetables, along with the cooked and cooled wild rice, with any clumps in it broken up. Add the potato starch, seasonings, and eggs. Mix well. The mixture will be very loose and lumpy, but don't worry. Once you get it into the pan and cooking, it will rapidly become more co-operative.
 
Heat enough oil to generously cover the bottom of a large skillet, and ladle spoonfuls of the mixture in. Spread them to form neat, 1/2" thick patties. For the first 30 seconds or so, you can push the edges inwards to form neater shapes. Then cook them over medium heat for a total of 3 minutes per side, until firm and well browned. Add a little more oil as you turn them or if making new patties, if needed to prevent sticking.


Last year at this time I made... uh, this is embarrassing, actually... Carrot-Halloumi & Dill Fritters with Garlic Yogurt. Very much the same principle, with a slight change in ingredients. This one would also go well with Garlic Yogurt.